
These instructions are for remotely tuning the Bosch MED 17.3.5 ECU's in the 2017-2025 Alfa Romeo Giulia and Stelvio Quadrifoglio (2.9L) models. Removing the ECU's is notoriously difficult on these vehicles, and this remote tuning solutions avoids that hassle.
If the instructions are followed correctly, this will be a smooth and easy process.
Use of this system does require the use of a laptop.
- Download the Alientech Suite Software
- Create a folder on your computer where you plan to store the files associated with tuning
- Disconnect the negative battery cable
- Remove the engine cover to gain access to the two ECUs, which are located on the firewall
- Unplug the two connectors from the driver's side ECU as we will work with that one first. Keep in mind the instructions are the same for both ECUs, you can really do whichever one you want first.
The connectors will seem a bit tricky and there are a couple different types. In all cases there is some release you need to push or slide and then you can raise the release lever and free the connector.
- Now you must connect the remote tuning system connectors to the ECU. The two connectors ARE NOT THE SAME. You need to look at the pins and make sure they match up. The ECU has larger flat pin connectors on one side only and that's always the side that's to the left as you face the ECUs from the front of the car. You need to push the connectors down until they click on, then close the locking lever.
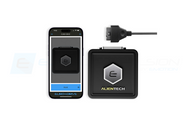
- Now that the ECU is connected, make sure the remote tuning system is connected to your laptop. Double Click on the Alientech Suite button on your laptop.

- Once the program loads, you will have a screen that requires you to select your vehicle. Use the drop down menus from the little arrows to select your car type. In this case either an Alfa Giulia Quadrifoglio (shown) or a Stelvio Quadrifoglio.

- Select your specific vehicle from the list. NOTE there are three shown here for the Giulia QV. The two showing Bosch MED17.3.5 are for engine ECU tuning, 8AT is for the automatic transmission cars, 6MT is the manual transmission. The other choice there is the Bosch ZF8HP75, that is for transmission tuning. In this example I selected the Giulia QV automatic for engine ECU tuning. Once you make your selection, press continue.

- Select this option, press Continue.

- Press X, unless you really want to see the manual, but you don't need to.

- Press Identify ECU and wait for the process to complete. Once it's done it will say “ECU identified correctly”.

- Now, press "Read Backup." The system will take a few minutes to read. It is important that you be patient and wait.
NOTE: It is important that you ignore all messages about "ECU Patch" as they do NOT apply to the procedure being done on your QV.
- When the read is complete it will ask you to save the file. Open the folder you created earlier for this purpose and name the file your name and the type of car. For example “John Smith Giulia QV Read Backup driver side.” Now, Read the other ECU the same way. Remember, the QV cars have two ECUs. Both must be read and both must be tuned.

- Send both files in an email to tuning@eurocompulsion.net and be sure to include your name and order number. Also include any info about your car and its modifications. Once we receive the files and required information, we will begin making your tune files. At this point, you may disconnect the remote tuning system and put your car back together. You will need to turn the steering wheel full lock to the left and right on first start up to clear the warning lights. Shut the car back off and restart it, and you may drive your car as normal.
- Once your tune files are ready, we will send them back to your in an email. You will now run steps 7 through 12 again and once the ECU is identified you will be on this screen.

- Click "Write Backup." Choose the file you wish to Write, it will be your name type of car, the tune, and be a .cod file. Example “John Smith Giulia QV Driverside Phase1.cod” Simply click that file and select "Open."
- Sit back and watch as the system writes to your ECU. Again, please be patient.
- Once complete, it will say “writing successfully completed ECU disconnection in progress... Operation complete." Press back, exit the software and remove the remote tuning system from the ECU.

- Repeat the writing process for the other ECU.
- Once both ECU's are done, close the software, disconnect the remote tuning system, reconnect the ECU's to their factory connectors, put the engine cover back on and reconnect the battery.
-
Once your remapped ECU is installed, before turning the vehicle on for the first time, perform this procedure first:
-Turn ignition on for 30 seconds (DO NOT START ENGINE)
-After the 30 second period is finished, turn ignition off for 10 seconds.
-Now you can start the engine for the first time.
-You will need to turn the wheel all the way to the left (full lock), and again to the right.
-The car will need to be turned on and off a few times before all dash messages and lights will disappear. This is normal when reinstalling an ECU.This portion of the procedure completes the throttle self learn process, which needs to be performed anytime an ECU is re-flashed or swapped in the vehicle and is crucial to proper throttle position for correct engine operation and performance.
Congratulations, your tune was applied successfully! To receive your deposit back for the remote tuning system, please safely ship it back to:
EUROCOMPULSION - TUNING
ATTN: ALEXANDER
10763 SAHOMA LAKE RD
SAPULPA, OK 74066
UNITED STATES
If you have ANY questions, please do not hesitate to contact us!