

Depending on your level of preparation and whether or not you have an assistant, expect this to take you anywhere from 4 to 11 hours to complete. This tutorial is divided into 8 parts, split across page 1 of this thread.
Notes in Italics are from Greg and relate to the RACE kit.
These instructions include BOTH the Eurocompulsion Inter-Cooler kit AND the Eurocompulsion Inter-Cooler RACE kit. Obviously removal of the stock kit is the same in either case. In terms of installation, the differences can be boiled down to three main points. The hot side (turbo side) piping in both kits is identical. The inter-cooler itself mounts the same way, but for the Race kit it's more difficult with the front bumper cover in place because it's harder to reach the top mounting bolts. You can still do it, and that's the way we do it, but some may prefer to remove the front bumper cover. The hot side pipes are the main difference as it's in three pieces for the Race kit.
Before you begin, inspect the inter-cooler core and main hoses for any internal debris. We do this before shipping, but it's possible that we miss something, or that something gets in there after we check them. We don't want a nut or a rock getting into your engine!
RACE: Check the security of the three plugs for the water injection nozzle fitting on the inter-cooler, and the two fittings on the hard metal pipe. These are 1/8 NPT fitting and do not technically require thread sealant, although adding it is a good idea, and I do that.
Tools Required:
- 7mm & 8mm 1/4 drive sockets or 1/4 drive bits
- Mini ratchet driver (Like this one on Amazon.com)
- 3/8" drive ratchet with 10mm socket
- 10mm, 12mm, 13mm, and 14mm offset wrenches
- Flathead screwdriver
- Long flathead screwdriver
- 21mm socket (for lugnuts)
- 5mm and 6mm hex bits (a multi-bit hex tool will also work)
- A jack, two jack stands, and a jack pad. (I got mine on Amazon.com)
- Soapy water
Note: The mini ratchet driver will make your life a lot easier. You'll be working in some tight spaces, so small and maneuverable tools will be good to have.
Note: If you don't have access to a lift, you'll be under the car on your back for a couple of hours. I recommend a helper to pass you tools so you don't have to keep crawling back out, and a stiff pillow (or blanket you can roll up) you don't mind getting dirty to make this more comfortable. This tutorial assumes you do not have access to a lift.
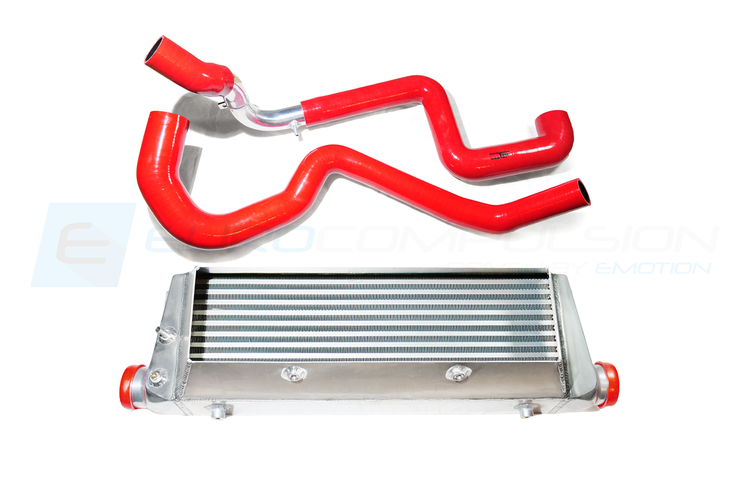
Part Required:
EUROCOMPULSION FIAT 124 Spider Intercooler Kit
or EUROCOMPULSION RACE Intercooler Kit
Part 1: Stock System Overview:
Before you start, it will be helpful to familiarize yourself with the stock system. I put it mostly together in the image below:

Marked with red arrows are connections fitted with hose clamps. There are 5 hose clamps total. Some use 7mm and some use 10mm bits/sockets.
Marked with yellow arrows are joints between the flexible rubber hose and the plastic pieces. There are 5 of these joints in total.

To disconnect the hoses from the plastic pieces, I simply wedged a flathead screwdriver under the wire retainer and lifted it out of the locking slot. This is all you need to do to disconnect these; the hose will slide right out.

Part 2: Preparation
1. Lift the front of the car enough that you will be able to comfortably work underneath. As noted above, I recommend using a jack pad to protect the pinch welds.

- Remove the front wheels on both sides. The lugnuts use a 21mm socket.

- Remove all of the fasteners holding the upper wheel well liner in place. To do this, simply slide the screwdriver under the center tab and wedge it outward. Note: I'm not marking all of the fasteners since there are simply too many. Work your way around and remove all of them until the liner comes out.

- Remove the front wheel well liner, working your way underneath the car as well. Note, you will find some metal screws here as well that you can remove either with a socket or with a Philips screwdriver. Do not remove the fasteners marked in red.

- Repeat steps 3-5 for the passenger side of the car.
6. Remove the center under-body shield. Note that the fasteners on the rear are larger than the ones you pulled earlier. Make note of this for re-assembly. There are also two 10mm bolts in the rear and some screws in the front.


- Next, move over to the engine bay.

- Remove the intake.
Part 2: Preparation, continued
9. Next, loosen the battery terminals with a 10mm socket (lift the flap on the + side), and remove (or loosen) the two nuts holding down the battery bracket. Note: once you remove the battery, you will have no power in the car. This means you won't be opening the trunk or sliding up the windows. If you're parked outside, make sure the car is unlocked, top up, and the windows up before you pull the battery.

- Remove the battery sleeve by pulling upward.

- Remove the battery.

- Remove the three bolts holding down the battery tray.

- Using a fastener removal tool or flathead screwdriver, remove the fastener marked below.

- Next, remove the wiring harness from the battery tray. To do this, you have to rotate the battery tray and wiring until the fastener and tray line up.

- Remove the battery tray.

You're now ready to remove the stock intercooler hoses.

Part 3 - Driver's Side Removal
1. Loosen the hose clamp going into the intercooler elbow, and disconnect the other end of the hose from the plastic piece.

- Loosen the hose clamp going into the turbo (from the top of the engine bay), using a 10mm socket.

- Disconnect the diverter valve wiring.

- From the wheel well, remove the plastic shield held on by the bolts marked below.

- Remove the bolts that go in the positions marked in red. I didn't get a chance to take a picture of these before removal. Next, remove the nuts securing the sway bar to the chassis. Do this for the passenger side as well.

- In the engine bay, you'll see the following bolt holding a bracket to the chassis. Remove it using a wrench. This bolt holds down the bracket for the plastic hose piece. You can also remove this with some extensions and a swivel from the engine bay.

- Remove the hose from the turbo, and disconnect the other end of the hose from the plastic hose piece.

- Back down in the engine bay, you'll now be able to move the plastic intake piece. Move it rearward so you can access the bolt holding the bracket to the plastic piece. Remove this bolt.

- By moving the sway bar forward, you will now be able to slide the plastic piece out from underneath the car, completing the removal of the driver side intercooler hose.
Part 4 - Passenger Side Removal
1. Loosen the hose clamp connecting the rubber hose to the elbow coming out of the intercooler.

- Disconnect the other end of the rubber hose, and remove from the car.

- From the passenger wheel well, remove the plastic shield. This shield is held on by one fastener, and a clip molded into the shield itself (bottom arrow). To fully remove it, just pull sideways. Next, remove the two bolts shown and separate the brake line bracket.

- Remove engine shield by removing the 12mm bolts marked below.

- Disconnect the retaining clip on the hose as shown below.

- At the other end of the hose, disconnect the retaining clip, and remove the hose from the car. Next, remove the two bolts marked in red.

- Look up into the engine bay from the opening to the passenger side of the engine, and you'll see two hose clamp heads. Loosen both of these, with a 7mm and 10mm socket/bit respectively.

- Attached to this plastic intake piece is a sensor with a clip just like the one attached to the diverter valve in Part 3 - Step 2. I found it easiest to use a long screwdriver to wedge the yellow locking clip outward, then disconnect the wiring from underneath the car.

- To get this plastic intake piece out of the car, rotate it clockwise until the upper bolt bracket clears the engine mount, and pull toward you from the bottom.

Part 4 - Passenger Side Removal, continued
10. From underneath the car, use a 10mm wrench to remove the two bolts (which you cannot see) holding the metal bracket that holds the plastic piece that's still in the car. This is easier than it looks, just take your time.

- Once you have the bracket disconnected, you can rotate the plastic piece. On the top, disconnect the hose by sliding the purple locking clip backward. The hose can then be removed through the top of the engine bay.

- The final plastic piece can be removed in the following alignment to the passenger side of the engine.

- Using the 6mm hex bit, remove the sensor from the plastic intake piece as shown below.

Part 5 - Intercooler Removal
1. Disconnect the 3 nuts on each end of the intercooler to remove the elbows.

- Remove the nut shown below on both sides of the car.

- Above the intercooler, remove the bolt shown below on both sides of the car.

- On the passenger side, you may have another bracket attached to the intercooler bracket; remove the nut holding this one on.

You should now be able to remove the intercooler from the car in addition to the two brackets.
Part 6 - EC Intercooler Install
1. There are two bolts holding the front horn in place. First, remove the lower bolt and disconnect the horn entirely. Bend that end of the bracket forward, or it will not clear the intercooler. Reinstall the horn, and re-position the bracket as needed by loosening the bolt marked at the top if needed.


- Install the top bracket using the three bolts, three nylon spacers, and two nuts in the alignment shown below.

- There should be two bolts on top of the intercooler. Loosen those so you have a good 1/2" or so of clearance, then fit the intercooler over the slotted opening. It helps to have a helping hand for this step.

- You should have some washers with the upper intercooler bolts. Since the washers will be at the bottom when you hang the intercooler, disconnect one side at a time, moving the washers to the top, and re-hang the intercooler on the bracket so that the washer is above the bracket, not below. Next, tighten the bolts from underneath the car using a wrench.
RACE: The Race Inter-Cooler's ducting makes this step more difficult as it leave less space to get your hand and a wrench onto the bolts that secure it to the top bracket. It can be done, and it's the way I do it. However if you are installing the inter-cooler with the front bumper cover off, then it's not a problem at all.

- Install the lower bracket by reusing the bolt attached to the chassis, and one of the nuts you removed from the OE brackets. Additionally, install the lower bolts using the 7mm hex bit.

RACE: At this point attach the longer small diameter hose to the fitting at the front of the intercooler. Run that into the engine compartment. It connects to the pressure side of the EVAP venturi. In other words, this replaces the hose that connected hot side inter-cooler piping that was removed in Part 4, step 11 of these instructions. If installing a water injection nozzle, this is a good time to do that.
Part 7 - EC Intercooler Hose Install
After fighting with the OE intercooler plumbing, you'll laugh at how easy this part is. I got the driver's side installed in under 5 minutes.
1. Coat the inside of the intercooler hose with soapy water, on both ends. This will make reinstall much easier.
2. Run the driver side intercooler hose through, underneath the sway bar, and into the engine bay. Attach the bottom end to the intercooler.

- Attach the other end of the driver side hose to the turbo, and tighten the clamp.


- Run the passenger side intercooler hose through. You may need to do some twisting and rotating of the hose, but follow the original path and it will fit pretty easily.


- Attach the lower end of the hose and tighten the hose clamp.
RACE: The cold side hose is in three sections, the first attaches to the inter-cooler. That attaches to the metal pipe, which bolts to the car. Then the short section of silicone connects the pipe to the throttle body.

Keep all three pieces separate for now. It's easiest to start with the hard metal pipe and the short silicone coupler.
Connect the short coupler to the hard pipe, the coupler is NOT symmetrical, the longer end from the elbow of the coupler goes onto the hard pipe, the short end onto the throttle. Don't worry about clamps yet.
Use a solution of dish soap and water to make the couple slide onto the metal pipe. Now, put the metal pipe and coupler into position to find the optimal angle for the coupler to sit on the pipe. It should be something like the picture. Rotate it, which will be easy because of the soap and water so that the mounting flange lines up with the bolt hole and the coupler is square on the throttle. Once you are happy with this, remove it without disturbing the position and double clamp that coupler onto the pipe. Put another clamp onto the coupler loosely fitting for the throttle end.
Now Install the metal pipe and coupler, Tighten the clamp at the throttle, and bolt up the mounting bracket to the motor mount. The mount is seen in the next picture. Re-use one of the bolt that was retaining the factory system.


- Attach the upper end of the hose to the throttle body, and tighten the hose clamp securely. I didn't get a picture of this, but I found that aligning the hose clamp head to the left (as you sort of see in this next photo) was an easy way to install it. Make sure it's pushed all the way up and snug, and make sure it's tight, since it's under high pressure and you don't want it popping off. Next, install that sensor you removed earlier. This will be a bit of a tighter fit. Attach the wiring connector and push in the locking clip. Note: I've learned that there should be a hose clamp here. While not pictured, it will be included in your intercooler kit.
Race: This part is easy, just connect the big silicone piece to the inter-cooler outlet at one end and the hard metal pipe at the other. I suggest double clamps at the hard pipe.

- Lastly, attach the vacuum hose and run it back up into the engine bay. Note the orientation of the hose clamp here. You may need to rotate this so it is facing away from the A/C line. This ensures that it will not rub against the A/C line. In my car, I found that I had to bend the A/C line half an inch or so away from the intercooler hose as it was too close for comfort.
Race, Use the included silicone hose to connect the fitting on the hard pipe to this sensor. Clamp it onto the sensor, there is no need to clamp it onto the fitting. Don't worry too much about hose length, just route it in the easiest way you can, a few extra inches or even an extra foot will make no difference on this car. Use a hose clamp on the sensor end. Don't tighten it too much, you don't want to break the sensor. Zip tie the sensor to a secure location.


Part 8 - Final Steps
Race, if you have it, install the nitrous nozzle and or the temperature sensor. You can put either one in either location. Use only a wet nitrous system with the MM ECU, contact us for help if you need it.
1. Reinstall the brake line bracket.
2. Reinstall the plastic shield next to the brake line bracket.
3. Reinstall the plastic shield on the driver side to the left of the sway bar bushing.
4. Reinstall the sway bar bushing nuts.
5. Reinstall the lower body panel, the engine shield, and the wheel well liners.
6. Reinstall the battery tray, reconnect the wiring, and reinstall the battery.
7. Reinstall the diverter valve wiring connector.
8. Reinstall the intake (remember to connect the black vacuum hose coming out of the passenger side intercooler hose).
9. Reinstall the wheels, torque lugnuts to ~80 lb-ft (Works for stock wheels and most aftermarket set ups) and lower the car.
10. Go out for a drive.